Dominos Garlic Parmesan Sauce
We show how to recreate the famous flavor at home in under 30 minutes. Keesha’s recipe takes just 28 minutes of active time and yields a creamy, rich topping that lifts weeknight meals.
Use this blend as a pizza topping, a salad dressing for a crisp kale and chicken salad, or a simple dipping sauce for baked chicken wings and air-fried potato wedges. It pairs well with roasted or grilled chicken and makes snacks taste special.
We simplified the steps so anyone can master the recipe quickly. Follow our guide and you’ll have a versatile dipping condiment that adds depth to every bite. Try it at your next dinner or party to impress guests and boost flavors.
Understanding the Appeal of Dominos Garlic Parmesan Sauce
A well-balanced white blend can turn a weeknight pie into something memorable. We aim to unpack why that creamy topping earns a loyal following and how its profile lifts simple recipes.
Defining the Signature Flavor Profile
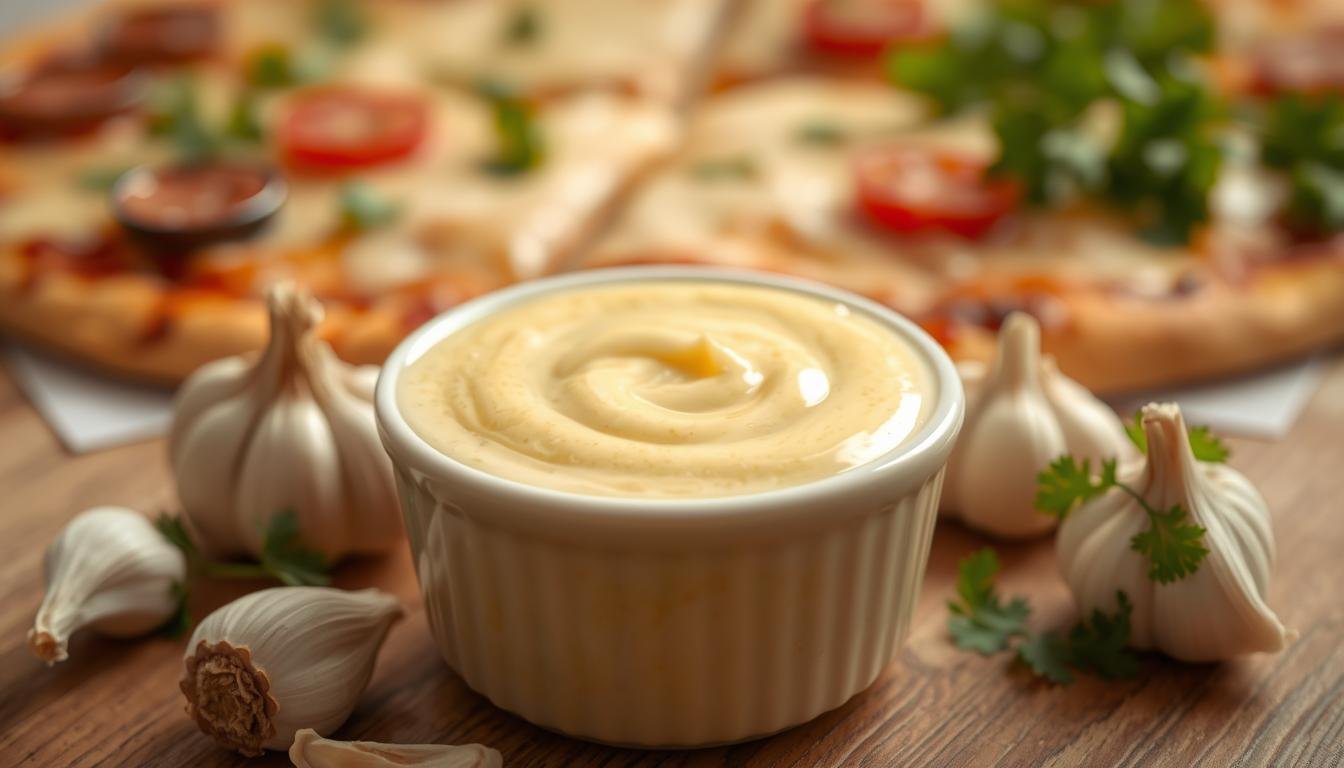
The core comes from a blend of savory cheese and fresh garlic that creates rich, lingering notes. We balance milk fat and grated parmesan to get a silky mouthfeel without heaviness.
That mix of sharp and mild cheese gives depth. We find the contrast with a red base highlights unique flavors and makes each slice pop.
Exploring Culinary Versatility
This parmesan white approach works across crusts, from thin to hand-tossed pizza. It pairs with roasted chicken, veggies, or as a dipping complement for baked bites.
We view it as a multi-use pizza sauce that elevates toppings and adds a gourmet touch to home cooking.
| Characteristic | Notes | Best Uses |
|---|---|---|
| Texture | Silky, creamy, lightly thickened | Brush on crusts, dip for wings |
| Primary Tastes | Umami from cheese; savory garlic edge | White pizzas, salads, roasted proteins |
| Pairing | Works with mild herbs and bold toppings | Thin crust, hand-tossed, or flatbreads |
Essential Ingredients for Your Homemade White Sauce
A silky white sauce begins with a simple blend of butter, flour, and warm milk.
We build a roux using 1/4 cup unsalted butter and 1/4 cup flour. Then we whisk in 1 1/2 cups of full-cream milk until smooth. This gives a rich texture that clings to crusts or proteins.
To boost savory flavor without excess salt or sugar, we add 1/4 cup vegetable broth. For the signature cheesy note, stir in 1/2 to 3/4 cup finely grated parmesan cheese and 1 tablespoon minced garlic (about 3 large cloves).
- Optional herbs: dried parsley and dried oregano
- Seasoning: sea salt flakes and freshly ground black pepper to taste
| Ingredient | Amount | Role |
|---|---|---|
| Unsalted butter | 1/4 cup | Forms roux; adds richness |
| All-purpose flour | 1/4 cup | Thickens base |
| Full-cream milk | 1 1/2 cups | Creates creamy texture |
| Parmesan cheese & garlic | 1/2–3/4 cup; 1 tbsp | Defines cheesy, pungent flavor |
Preparing Your Kitchen for the Perfect Blend
Before we heat the pan, a quick setup makes all steps smoother and prevents common mistakes.
Gather a medium saucepan, a wire whisk, a measuring cup, and a silicone spatula. Use a heavy-bottomed saucepan to spread heat evenly and avoid burning while melting butter.
- Collect ingredients: butter, flour, milk, broth, and pre-grated cheese so melting is fast and even.
- Clear and clean your workspace to reduce cross-contamination and speed up the process.
- Arrange tools within reach so you can move from melting to whisking without pauses.
We recommend having the cheese grated and the milk measured before turning on the heat. This lets us focus on whisking technique and prevents lumps in the creamy base.
| Tool | Purpose | Tip |
|---|---|---|
| Heavy-bottomed saucepan | Even heat distribution | Prevents hot spots |
| Wire whisk | Smooth blending | Use steady, circular motions |
| Measuring cup & spatula | Accurate portions and scraping | Keep nearby for fast transitions |
Step by Step Guide to Creating the Base
We begin on the stovetop with a steady medium heat to build a reliable creamy base.
Heat a medium saucepan and add the butter and a small amount of minced garlic, stirring often so the garlic does not brown. Once the butter melts, whisk in the flour until the mix looks like dry crumbs.

- Slowly pour the milk in small additions, whisking after each pour to stay lump-free.
- When all milk is blended, stir in the vegetable broth to deepen the savory profile.
- Bring the sauce to a boil over medium-high while whisking constantly, then lower heat to simmer until it thickens to the desired base consistency.
Continuous whisking is our secret to a silky texture that works as a pizza sauce or a creamy dip. Season lightly with salt and pepper to taste, and adjust herbs as part of final customization.
| Step | Purpose | Tip |
|---|---|---|
| Whisk flour into butter | Forms roux base | Work quickly to avoid lumps |
| Add milk gradually | Prevents clumps | Keep heat steady |
| Simmer with broth | Enhances flavor | Watch thickness |
Incorporating Savory Garlic and Parmesan Notes
We finish the sauce by folding in finely grated parmesan cheese and dried herbs so the base sings.
After the mixture thickens, keep the whisk moving as you add the cheese. This prevents graininess and produces a smooth, even texture. Use finely grated parmesan cheese so it melts quickly into the warm milk and butter base.
Add dried parsley and a pinch of dried oregano near the end. That preserves color and gives a fresh herbal lift against the rich cheese and sautéed garlic foundation.
- Whisk constantly until cheese fully melts.
- Taste, then season with salt and freshly ground black pepper.
- Adjust small amounts to balance the salty cheese and bright herbs.
| Action | Why | Tip |
|---|---|---|
| Fold in cheese | Smooth, creamy texture | Use finely grated variety |
| Add herbs late | Preserve color and flavor | Stir gently |
| Season to taste | Balance saltiness | Start light with salt and pepper |
Achieving the Ideal Sauce Consistency
Small adjustments on the stove let us dial the body of the white base from silky to spoon-coating. We focus on control: steady heat, constant whisking, and small additions of liquid.
Thickening Techniques for Richer Results
If the base is too thin, make a cornstarch slurry. Whisk 1 tablespoon cornstarch with 1/2 cup of the runny sauce until smooth.
Return the slurry to the pot and bring the mix to a boil. Boiling activates thickening and removes starchy taste.
Thinning Methods for a Lighter Texture
To loosen the body, add milk a tablespoon at a time while whisking. Stop when the sauce coats the back of a spoon.
Avoid thinning with broth; added salt can become impossible to fix. Keep extra milk on hand for fine control.
- Heat: keep medium-low to prevent over-reduction.
- Whisk: constant motion yields a lump-free base.
- Finish: remember the mix will thicken as it cools; aim slightly looser than final target.
| Issue | Fix | Key Tip |
|---|---|---|
| Too thin | Cornstarch slurry (1 tbsp + 1/2 cup) | Boil briefly after adding |
| Too thick | Add milk in small amounts | Whisk between additions |
| Grainy texture | Lower heat and whisk until smooth | Use finely grated cheese and steady heat |
Troubleshooting Common Texture Issues
Small mistakes on the stovetop often cause lumps, but targeted steps restore a smooth finish fast.
If you spot lumps in the white sauce, whisk vigorously right away. If that fails, strain the warm mixture through a fine-mesh sieve to remove bits and regain a silky body.
Adding milk too quickly to the butter-and-flour roux is the most common cause of clumps. Pour in slowly while whisking to keep the sauce uniform.
- If the sauce is too thick, whisk in small amounts of milk until you reach the desired consistency.
- Keep heat low to prevent scorching; high heat ruins the milk and makes the flavor flat.
- If separation occurs, remove the pan from heat and fold in cheese off the burner to avoid breaking the emulsion.
Use a whisk rather than a spoon to fully incorporate flour and eliminate grainy texture. If the mix tastes starchy, simmer a bit longer to cook out the raw flour.
| Issue | Quick Fix | Tip |
|---|---|---|
| Lumpy texture | Vigorous whisk or sieve | Add milk slowly |
| Too thick | Whisk in milk | Adjust in small amounts |
| Separation | Cool slightly; fold cheese off heat | Use low heat and steady whisking |
Tips for Enhancing the Flavor Profile
A few targeted additions will deepen the sauce without adding fuss.
Start with high-quality, freshly grated parmesan cheese for better melt and a cleaner cheese flavor. Using full-cream milk keeps the base rich and rounded.
Sautéing garlic briefly in a mix of butter and a splash of olive oil adds complexity. Taste as you go and adjust garlic to control intensity.
Add a pinch of red pepper flakes for a subtle spicy lift. If the mix skews too salty from the cheese, stir in a small pinch of sugar to balance salt and round the flavors.
Finish with fresh parsley right at the end and a crack of black pepper. Let the sauce rest for a few minutes so flavors meld before serving.

- Use fresh cheese, not pre-packaged.
- Adjust garlic and black pepper to taste.
- Try different dried herbs for a custom flavor.
| Technique | Benefit | Quick Tip |
|---|---|---|
| Sauté in butter + oil | Richer flavor | Don’t brown the garlic |
| Rest before serving | Flavors meld | Cool 3–5 minutes |
| Balance with sugar | Reduces salt edge | Add very little at a time |
Storing Your Sauce for Future Meals
A few simple steps at the end of cooking will preserve texture and flavor for later meals. We let the mix cool slightly, then follow a routine that keeps the creamy body intact and ready for the next meal.
Proper Container Selection
Place the warm sauce in an airtight container to stop it from absorbing fridge odors. For best results, press a sheet of plastic wrap directly onto the surface before sealing. This prevents a dry skin from forming and protects the emulsion.
Use glass or high-quality plastic containers. These materials hold fewer smells and help keep the texture smooth. We recommend cooling the sauce at room temperature for up to two hours before refrigerating.
Store portions in small containers if you plan multiple uses. Label each container with the date and place them in the coldest part of the refrigerator. Proper storage keeps the batch fresh for three to four days.
- Cool before sealing to avoid condensation and separation.
- Label date and portion size for easy meal planning.
- Keep jars in the back of the fridge for maximum freshness.
| Need | Recommendation | Why it matters |
|---|---|---|
| Container type | Glass or high-grade plastic | Less odor retention; preserves texture |
| Surface care | Plastic wrap on top | Prevents skin and moisture loss |
| Storage life | 3–4 days refrigerated | Keeps flavor and safety for next meal |
Preventing Spoilage and Maintaining Freshness
A few simple fridge rules prevent spoilage and help preserve peak flavor. Because the base has milk, butter, broth, and sugar, it can grow mold if left uncovered or stored too long.
We recommend refrigerating the sauce in an airtight container within two hours of cooking. Press plastic wrap directly on the surface before sealing to block air and slow mold growth.
Consume the batch within three to four days. The dairy and fat content shortens safe time in the fridge compared with shelf-stable condiments.
Always use a clean spoon when serving to avoid introducing bacteria. If you detect an off-smell, discoloration, or any visible mold, discard the container immediately.
- Keep refrigerator below 40°F to protect milk and butter components.
- Store small portions to limit repeated exposure to air and hands.
- If reheating, warm only once and bring to steaming for safety.
| Risk | Prevention | Why it matters |
|---|---|---|
| Mold | Airtight containers + plastic wrap | Stops spores on the surface |
| Bacterial growth | Refrigerate within two hours | Limits growth in milk and broth |
| Off-flavor | Use clean utensils; small portions | Preserves flavor and reduces waste |
Creative Ways to Use Your Garlic Parmesan Sauce
This creamy blend is more than a pizza topper; it’s a multi-use finishing touch for countless dishes. We use it to lift simple weeknight meals and party snacks alike.
Try it as a pizza sauce on a homemade crust or a rich salad dressing for a kale and grilled chicken bowl. It also makes a dependable dipping sauce for breadsticks, chicken wings, or air-fried potato wedges.
Stir a few spoonfuls into hot pasta for an easy, cheesy dinner. Drizzle over roasted vegetables to turn a plain side into a gourmet bite. We also spread it on warm bread or fold it into a warm grain bowl for extra depth of flavors.
- Dipping for breadsticks and wings—great for group meals.
- Salad dressing for greens and grilled chicken.
- Finishing drizzle on roasted veg or baked chicken.
- Mix into pasta or use as a creamy pizza topping.
| Use | Best Pairing | Serving Tip |
|---|---|---|
| Dipping | Breadsticks, wings | Warm slightly before serving |
| Drizzle | Roasted vegetables | Finish just before plating |
| Mix-in | Pasta, grains | Toss while warm for even coating |
Keep a jar in the fridge so you can experiment. With this one batch, we enrich meals, snacks, and quick dinners all week long.
Pairing Suggestions for Chicken and Wings
We recommend pairing this creamy garlic parmesan blend with crisp baked wings to create a pleasing contrast of textures. The cool dip tames the hot, crunchy skin and adds a rich, cheesy note that guests love.
Serve the condiment on the side so everyone controls how much richness they add. For parties, set up a small dipping station with this option alongside ranch and blue cheese. That gives variety and makes hosting simpler.
We also pair the mix with chicken bacon dishes. The smoky bacon and tender chicken form a savory trio when matched with the creamy, herb-flecked dip. Fresh parsley brightens the plate and balances salt from the cheese.

- Try with baked or grilled wings—warm wings, cool dip.
- Use as a spread for chicken bacon wraps or pizza slices.
- Offer alongside roasted chicken pieces and crisp veggies.
| Pairing | Best Match | Serving Tip |
|---|---|---|
| Chicken wings | Baked, crispy | Serve chilled for dipping |
| Chicken bacon | Wraps or pizza | Add parsley and a light crack of black pepper |
| Grilled chicken | Sliced breast or thigh | Drizzle sparingly to highlight flavor |
Elevating Your Homemade Pizza Night
Swap the classic tomato base for a rich, cheesy white layer and watch simple toppings become extraordinary. We use our garlic parmesan base as the foundation to add depth and creaminess to every slice.
Top with pepperoni and finish with a generous drizzle of the pizza sauce for a savory contrast. The salty snap of cured meat pairs perfectly with the smooth cheese texture and bold flavors.
Experiment with mushrooms or sliced onions for extra umami and crunch. Try a white pizza topped with fresh herbs and a blend of your favorite cheese to make the pie feel gourmet without fuss.
Making this at home gives us control over ingredients and salt levels. Once you taste the difference, this creamy base often becomes a weekly staple for casual dinners and entertaining alike.
| Topping | Why it Works | Serving Tip |
|---|---|---|
| Pepperoni | Salty, crisp edges contrast creamy base | Place under and over cheese for texture |
| Mushrooms | Earthy flavor that complements cheese | Sauté first to remove excess moisture |
| Onions | Sweetness balances savory flavors | Use thin slices or caramelize for depth |
Nutritional Considerations and Dietary Awareness
Understanding the calorie and nutrient profile helps us use this creamy topping wisely.
A 2-cup serving provides about 397 kcal, 17g protein, 36g fat, and 24g carbohydrates. Sodium is higher than many expect at roughly 720mg per serving, so watch added salt when you use it with other seasoned items.
The recipe’s milk and cheese contribute calcium (about 562mg), which is a clear benefit for bone health. At the same time, the fat and salt mean we should enjoy the mix in moderation, especially with rich meat or bacon dishes.
To keep meals balanced, pair the dish with lighter sides. A crisp salad or steamed vegetables reduces overall meal density and brightens the flavors on the plate.
Adjust portions with a measuring cup and plan meal time portions so the sauce complements chicken or other proteins without overwhelming daily targets. Know the numbers, and you can enjoy the flavor while staying on track.
| Nutrient | Per 2 cups | Note |
|---|---|---|
| Calories | 397 kcal | Consider portion size |
| Protein | 17 g | Pairs well with chicken |
| Sodium | 720 mg | Limit extra salt |
| Calcium | 562 mg | From milk and cheese |
Comparing Homemade Quality to Restaurant Standards
Making this blend at home gives us full control over every ingredient and every layer of flavor. We skip unnecessary preservatives and adjust seasoning for the exact taste we want.
Compared to a standard domino pizza pizza sauce, our version offers fresher, more robust flavors. The short time investment is worth it when a single batch lifts a whole meal.
Focusing on high-quality Parmesan and fresh garlic lets us match or surpass restaurant-style results. That control also makes the mix a better companion for chicken, roasted meat, and pizza toppings.
We find the satisfaction of crafting this at home adds to the dining experience. Try your batch next to a favorite restaurant order and taste the difference.
- Cleaner profile from fewer additives.
- Custom seasoning for meat and chicken dishes.
- Better freshness and shelf-life when stored correctly.
| Feature | Homemade | Restaurant |
|---|---|---|
| Control of ingredients | Full control | Pre-mixed blends |
| Flavor depth | Adjustable flavors | Consistent, less fresh |
| Best for | Family meal, pizza, chicken | Quick service, takeout meat dishes |
Mastering the Art of Creamy Sauces at Home
Simple steps and a steady hand turn common pantry items into a silky, versatile topping we use across meals. This garlic parmesan white base proves that modest effort yields big flavor.
We rely on flour, milk, and butter as the backbone, then fold in good cheese and a touch of parsley for brightness. Gentle whisking keeps the texture uniform and helps the parmesan melt smoothly.
If the body needs adjusting, add milk a little at a time or use a cornstarch slurry to thicken. Watch salt and black pepper as final touches so the taste stays balanced.
Practice saves time and money. We encourage you to try this at home, share your results, and enjoy how a well-made white sauce lifts chicken, pizza, potatoes, and more.